Alex Bezek
October 29, 2020
Managed by Robots
At work my day job has typically been a Product Team individual contributor. However, building developer tools and automation within our organization has always been a side project of mine. Seeing time be wasted repeatedly on a manual task that could be automated just gets under my skin and forces me to do something to scratch that itch.
This post continues down the path set forward by my previous post describing this site. While the previous one touched on my motivations and the underlying static site generator framework I chose, here I hope to go in depth about the different pieces of automation for testing and deployments I have set up. Each of these is applicable and can be set up similarly for most Static Sites. Applications with a runtime get a bit trickier and are out of scope for this article.
Automated Deployments
Automating the deployment of your static site is probably one of the easiest and also most useful things to do. And when I say automated deployments, I don’t just mean upon merging to master, but rather, all pull requests get a feature branch deployed as well for previewing changes.
Many people’s go-to default choice for hosting a static site is to use GitHub Pages, and now a-days it’s pretty easy to set up a GitHub Action to automate publishing on merge. However, I haven’t found a good way to use it for branch deploys. One guy internally did once use GitHub pages for this by publishing different branches to different folders… but I said a good way :)
By far the best solution I’ve found for personal projects is to use a service like Netlify or Vercel (previously called Zeit). Because it’s just a static site, their free tiers have always been way more than enough. I’ve used both, and they both have pretty much the same features: automated deploys of any branch, immutable deploys for every commit, easy custom domain name set up, and easy custom lambda functions. I’ve been using Vercel because early on it got into the game of making Serverless API’s easily which I used for some other projects and got hooked. Since then Netlify seems to have the same thing via its Functions but I’m happy where I’m at.
Setting either of these up is super easy. For Vercel, once you have an account, you just need to install the GitHub App
. You’ll then want to configure your site’s build command. For my site running Hugo, I used hugo --ignoreCache --minify --baseUrl /. Primarily the baseUrl override is needed for Hugo to generate links to static assets correctly.
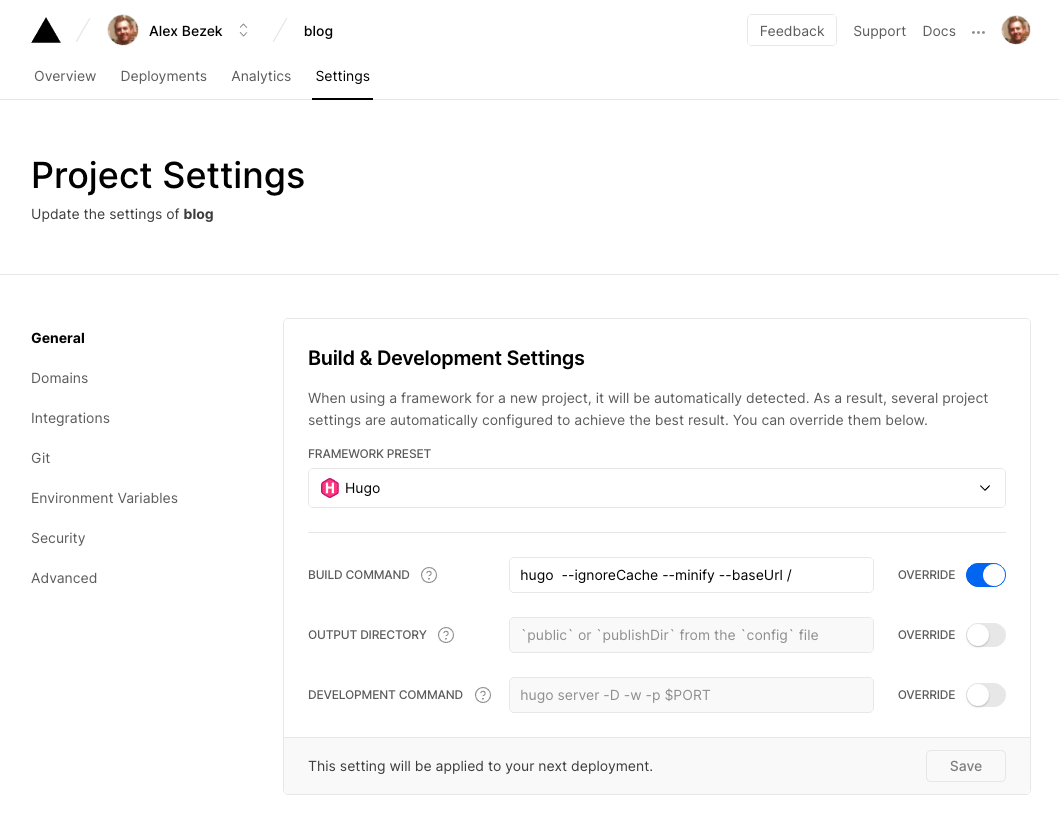
Next, create a branch and add the following vercel.json file to your root directory
{
  "build": {
    "env": {
      "HUGO_VERSION": "0.72.0"
    }
  }
}
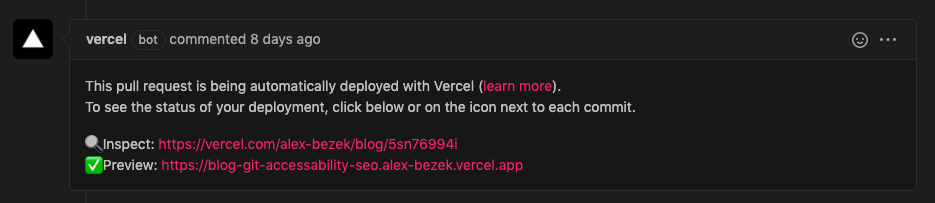
Lastly, open a PR and if things are set up properly, the Vercel bot will leave a comment linking to your static deployment.
As a last note here, if you stumbled across this but can’t use either of these because you need an enterprise level solution, you can see my full evaluation for our Company blog here . TLDR: If you need more than 1 account to have access, but it’s difficult to get money for some new service, then you can use Heroku which has a slightly larger number of allowed admins than Netlify/Vercel for its free tier, or use your company’s cloud provider like AWS Amplify. Personally, I don’t think Heroku is the right tool for the job of hosting static sites. You don’t need a fully docker container runtime to serve statics, and you lose out on many of the benefits of a static site by going this route. Again, use the right tool for the job, even if that means it’s a bit more work upfront.
Visual Regression Tests
Visual regression tests are the process of comparing the actual rendered UI of your branch vs master to check for any unexpected changes happened during the PR. Many teams just do this manually as part of their normal testing because it can be difficult to do automatically. For a full Rails application with dynamic data, it can be, but for a static website, it is much easier to lower false negatives and get value out of it.
Percy is a service that allows us to do this fairly easily with a 5k screenshot per month free tier. At its core, what it does is gathers screenshots across multiple browsers and viewports and saves them. Then when a PR comes in, it does this against the PR’s branch and shows you a visual diff of the screenshots, allowing you to approve or deny the changes if they are expected or not.

I increased the hit target of the nav links, the diff shows how they expand
To set it up, I created my free account, and installed the Percy Github App
with access to my repo. I grabbed the secret PERCY_TOKEN and set it as a github secret
. Lastly I just needed to set up a GitHub action to kick off the Percy builds. I followed this
guide and ended up with the following .github/workflows/percy.yml GitHub workflow file:
name: CI

on: [push, pull_request]

jobs:
  build:
    runs-on: ubuntu-latest
    steps:
      - name: Checkout
        uses: actions/checkout@v2
        with:
          submodules: true  # Fetch Hugo themes (true OR recursive)
          fetch-depth: 0    # Fetch all history for .GitInfo and .Lastmod

      - name: Setup Hugo
        uses: peaceiris/actions-hugo@v2
        with:
          hugo-version: '0.75.1'
          # extended: true

      - name: Build
        run: hugo --minify

      - name: Percy Test
        uses: percy/snapshot-action@v0.1.0
        with:
          build-directory: "public"
        env:
          PERCY_TOKEN: ${{ secrets.PERCY_TOKEN }}
And that’s really all it took. With this setup, it will build my Hugo site, and then use the Percy CLI to do snapshot testing of every route it finds in my build folder. Percy also offers a whole slew of other configuration options and custom snapshot gathering methods (like if you need to simulate interactions with the page). You may have different use cases and want to get fancier than I did.
I did however make 2 further customizations that may be of use to others. I was facing 2 issues: the first was that there was animated text on my page so each build would pick it up as a diff and flag it for review. To fix this I added custom css to Percy’s snapshots to disable the animation.
version: 1
snapshot:
  percy-css: |
    #ityped {
      display: none;
    }
The other issue I realized was that right now I was fine with the free tier, but if I wrote more posts, it would take snapshots of every one and I might surpass my free tier budget. To solve this, I configured Percy to only look at a predefined list of pages. I did this and configured the above file for use by updating the .github/workflows/percy.yml file with this
      - name: Percy Test
        uses: percy/snapshot-action@v0.1.0
        with:
          build-directory: "public"
          flags: --snapshot-files=index.html,404.html,posts/rails-environment-vs-deploy-environment/index.html
          config: ./.percy.yml
        env:
          PERCY_TOKEN: ${{ secrets.PERCY_TOKEN }}
And with that, now I have fairly stable automated screenshot diffs.
Dependabot
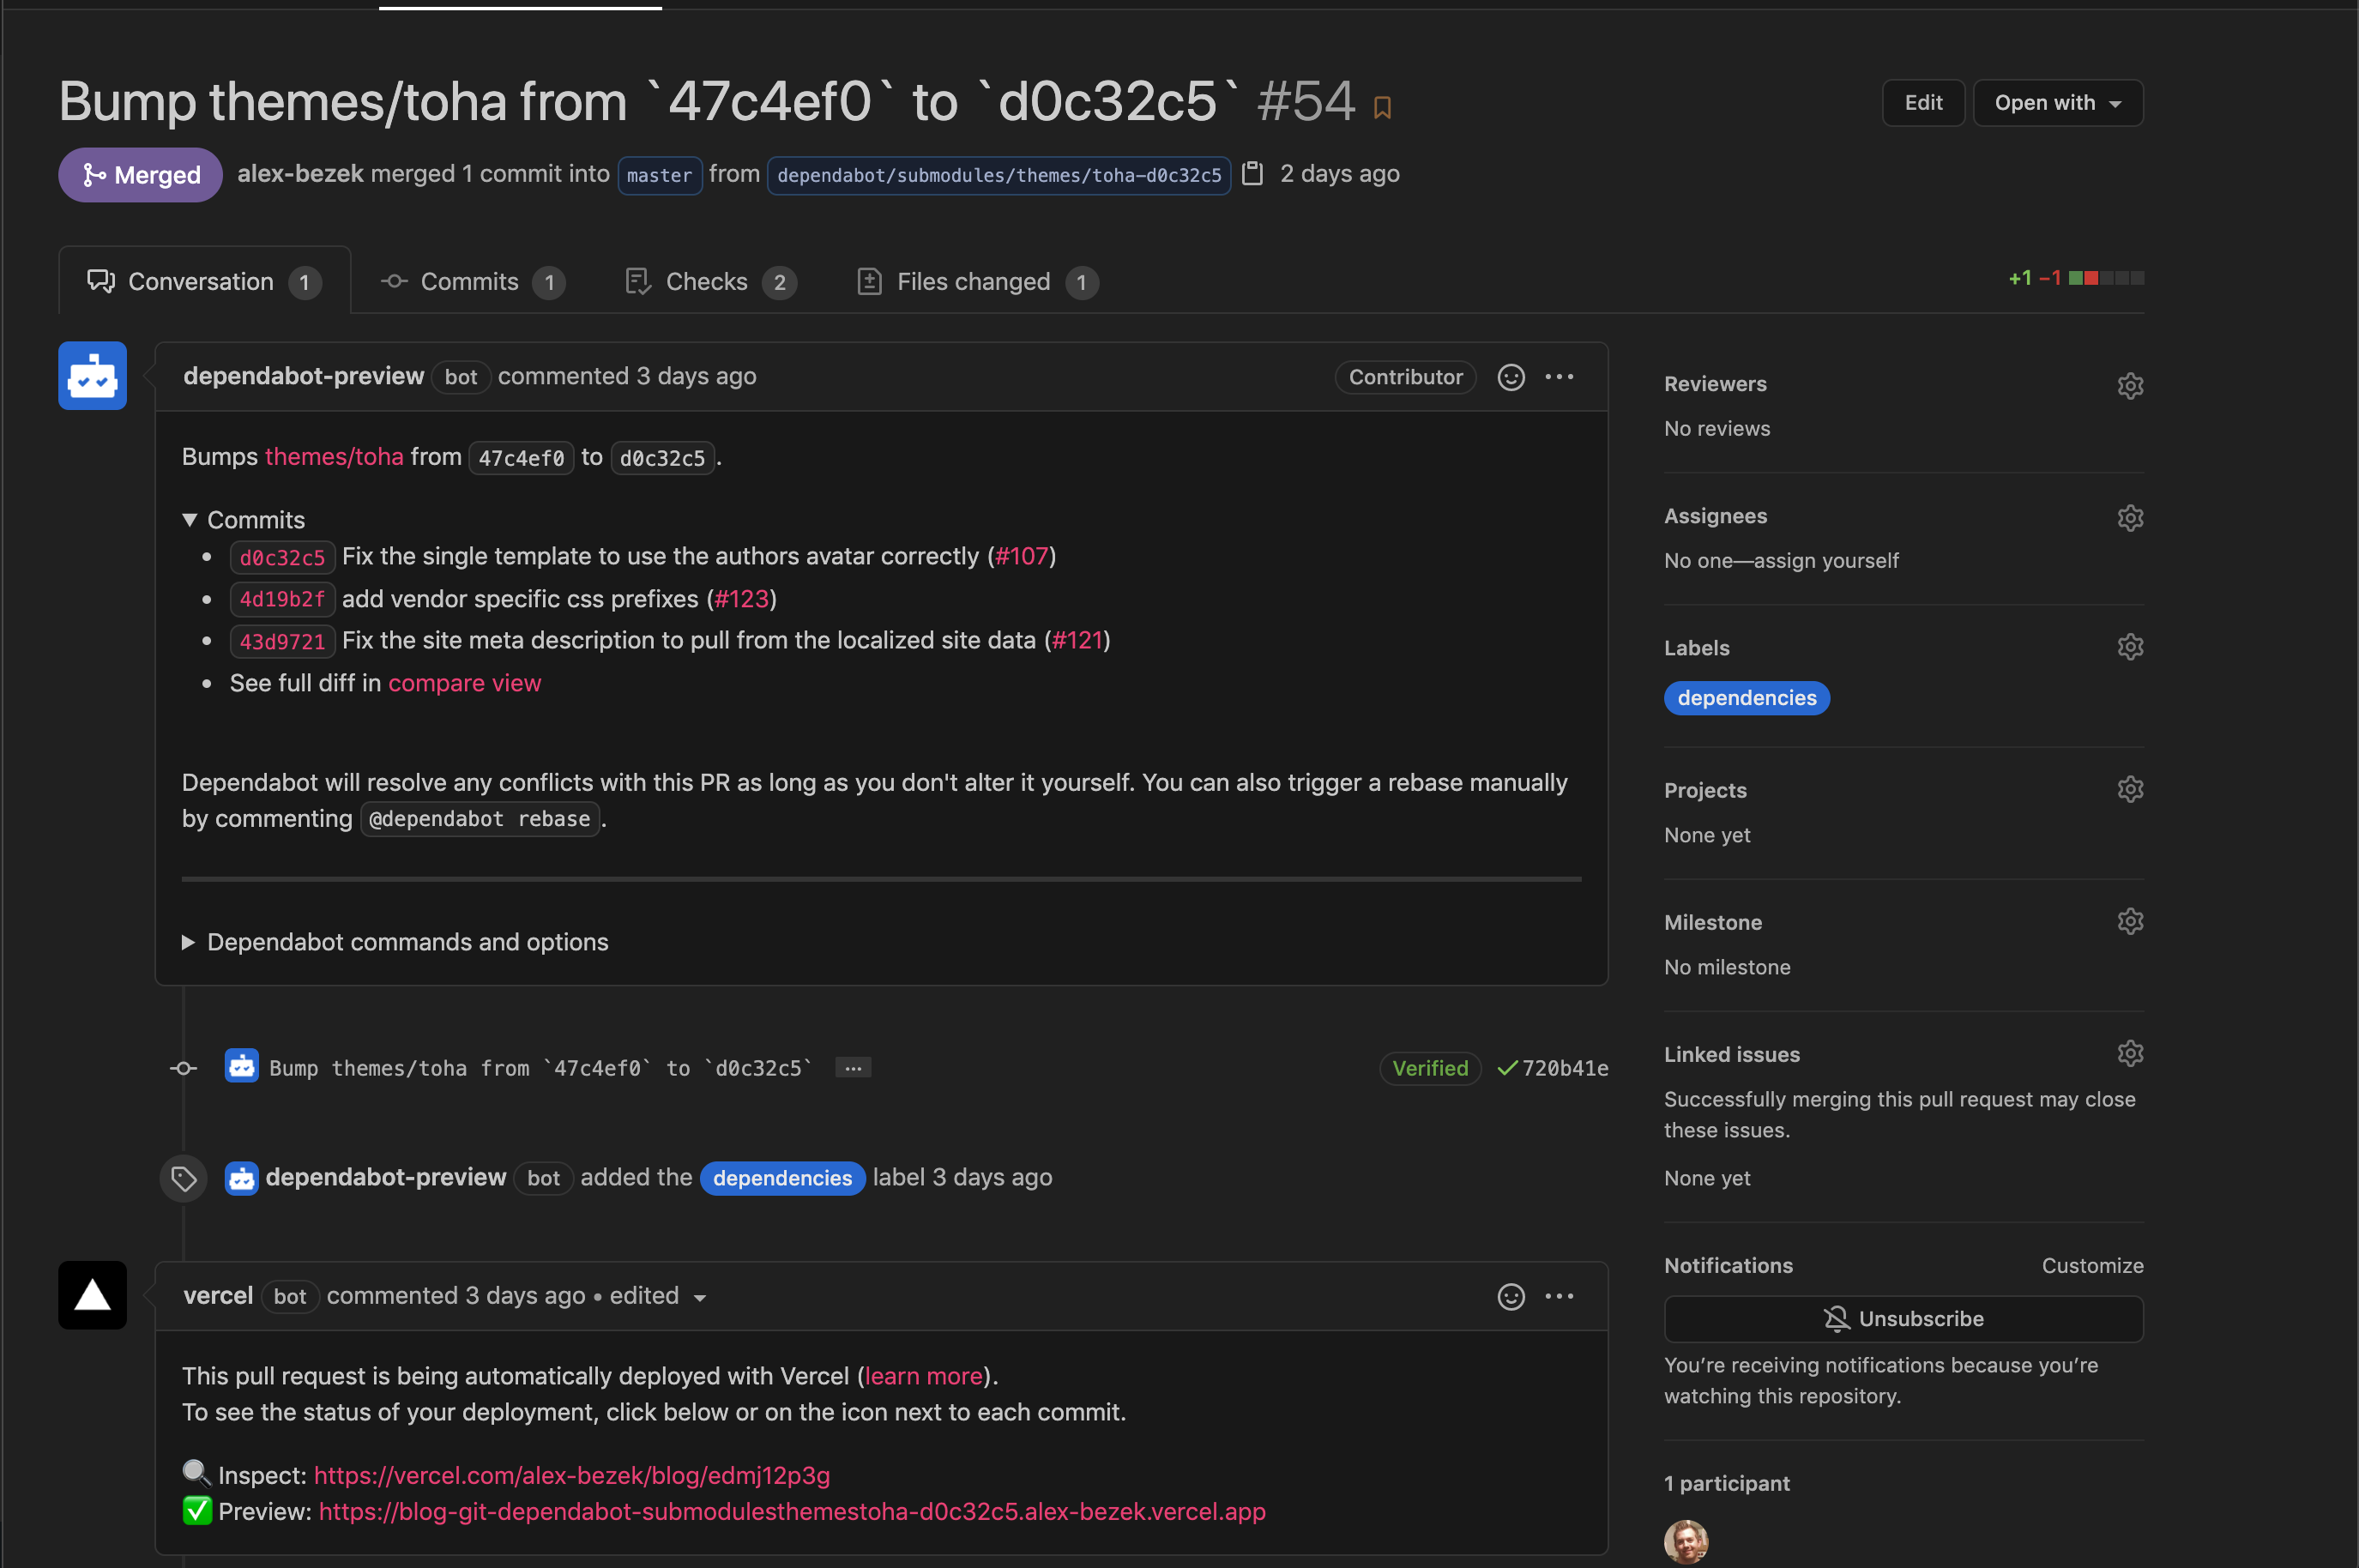
Ok, those were the hard ones, the next few are even easier. Dependabot is an awesome tool that will automatically watch for dependency updates your repo can take and opens PRs with those updates. In order to set it up, all you need to do is to create an account and install the bot . Lastly, just configure your repos in dependabot to look for specific languages and other things to upgrade dependencies for.
For this site, the only dependency I have is a git submodule. That’s because that’s how Hugo handles themes. My site just stores the theme repo as a submodule here and I would normally have to go pull in new git commits to the theme as they are created. Instead Dependabot will do this for me. This combined with the automated Vercel branch deployment, and Percy checking for visual passivity, I get some great confidence that I can consume the new changes passively.
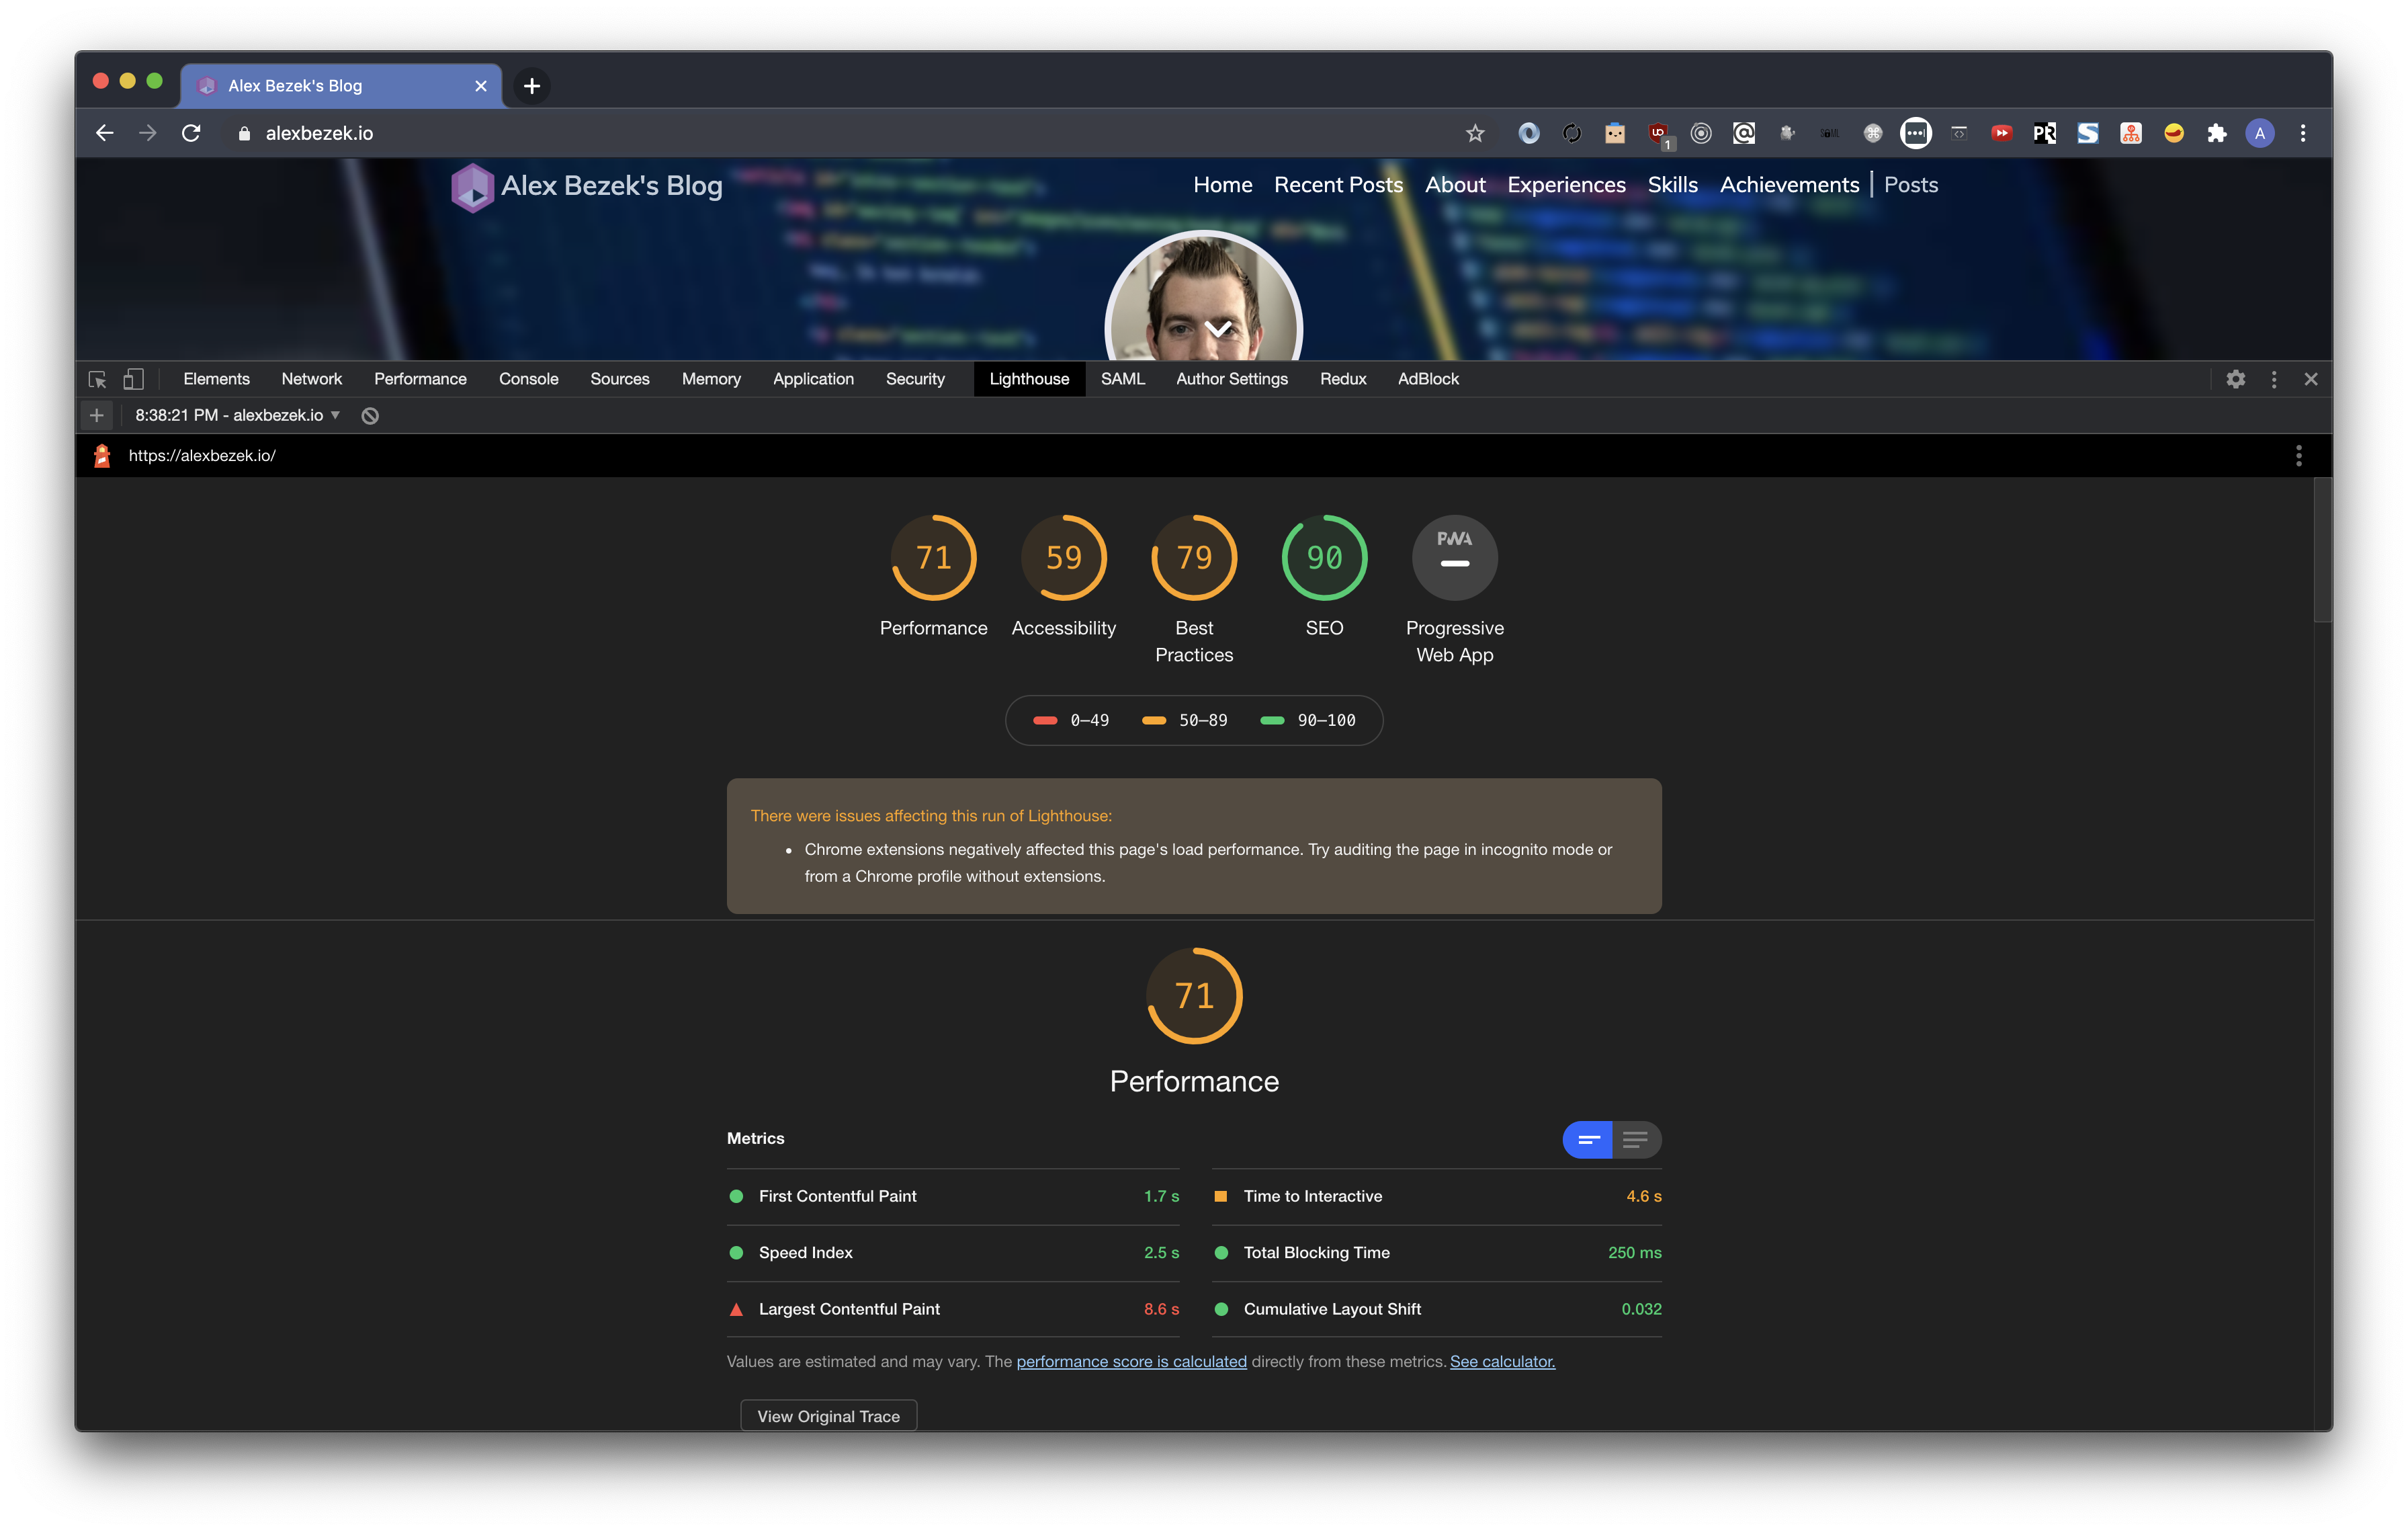
Google Lighthouse
Google Lighthouse is an industry standard now when it comes to auditing a website for best practices around Performance, Accessibility, and SEO. It’s built into Chrome and can be run on any site easily. It’s my go to tool for finding initial performance wins.
The site isn’t amazing right now when it comes to these scores, but I’m working with the theme maintainer to increase the default scores. If you are interested, I have an issue here showing the progress in the Accessibility and SEO area.
So the goal with Google lighthouse is the same as the other sections in this post, make the robots run it all the time so I don’t forget to and regress my site. In order to do this, I created the 2 following files:
A lighthouserc.json file at the root directory for configuring lighthouse
{
  "ci": {
    "collect": {
      "staticDistDir": "./public"
    }
  }
}
And a GitHub action file at .github/workflows/lighthouse.yml to set up the GitHub action
name: Lighthouse

on: [push]

jobs:
  static-dist-dir:
    runs-on: ubuntu-latest
    steps:
      - name: Checkout
        uses: actions/checkout@v2
        with:
          submodules: true  # Fetch Hugo themes (true OR recursive)
          fetch-depth: 0    # Fetch all history for .GitInfo and .Lastmod

      - name: Setup Hugo
        uses: peaceiris/actions-hugo@v2
        with:
          hugo-version: '0.75.1'
          # extended: true

      - name: Build
        run: hugo --minify

      - name: Run Lighthouse against a static dist dir
        uses: treosh/lighthouse-ci-action@v3
        with:
          # no urls needed, since it uses local folder to scan .html files
          configPath: './lighthouserc.json'
          uploadArtifacts: true
          temporaryPublicStorage: true
To see this in action, this is the score of my current site…
and then looking at the PR I’ve opened to test my Accessibility and SEO fixes here you can see it shows the improvements here
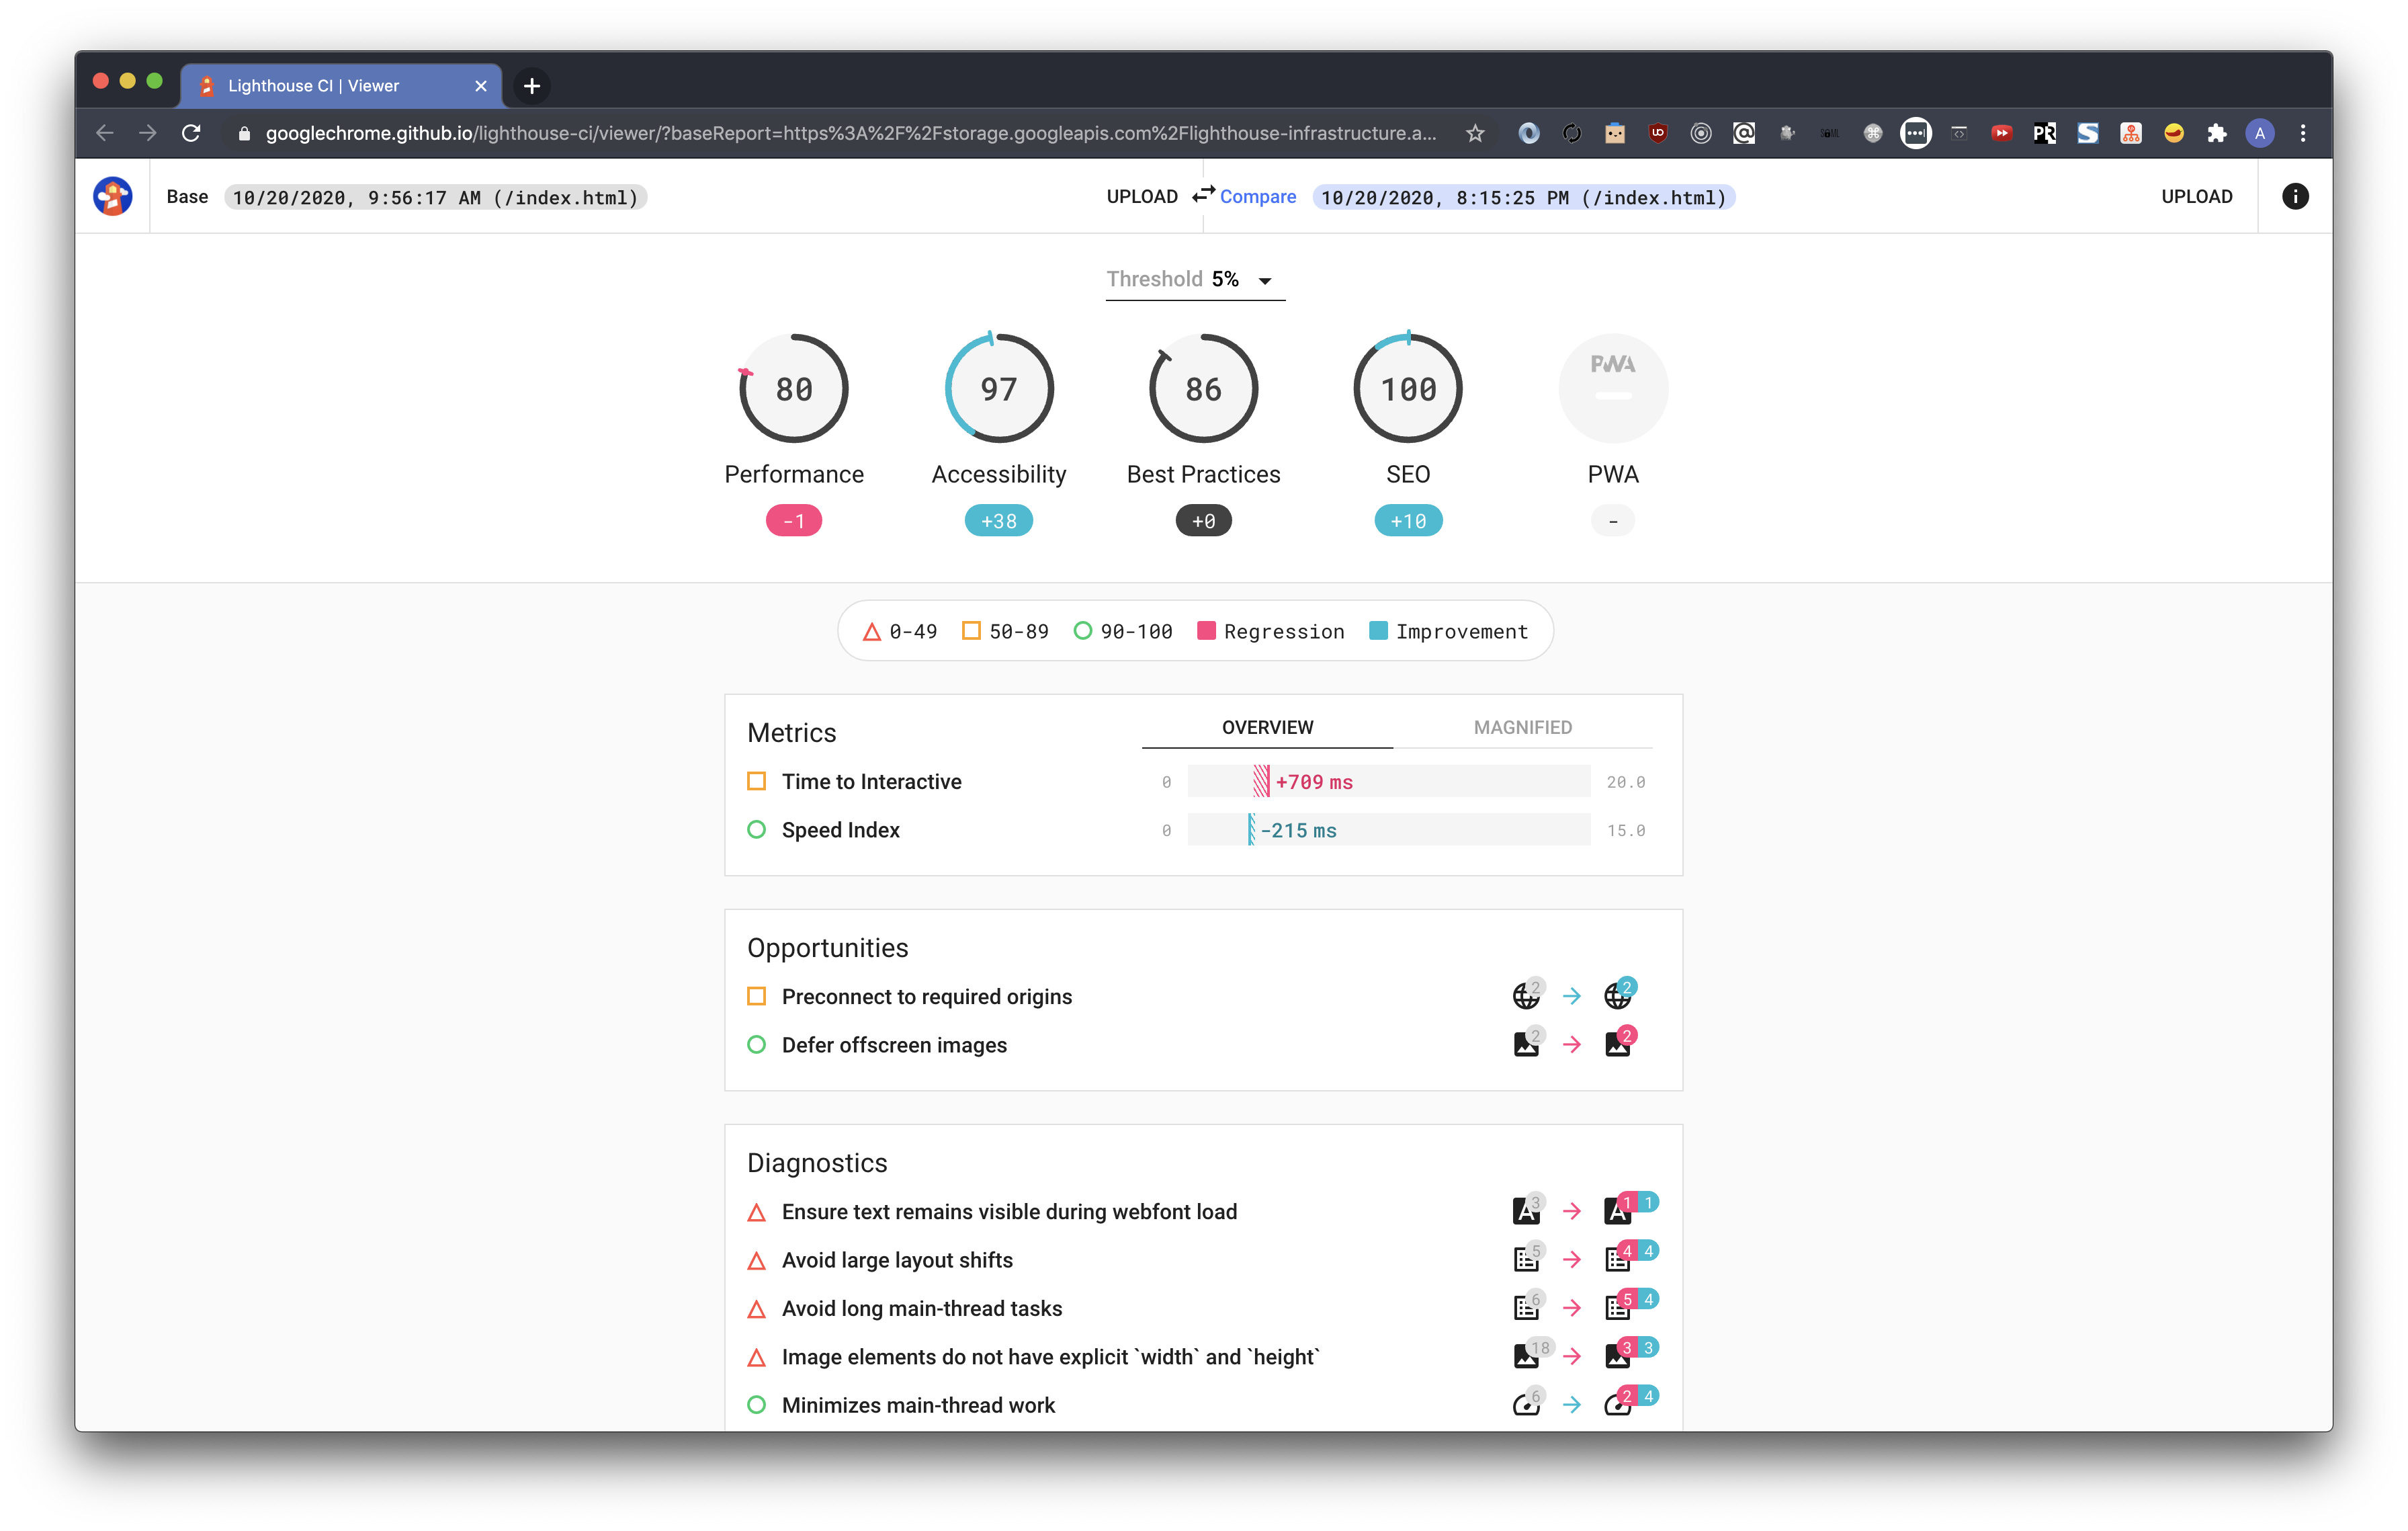
Right now, its very basic and doesn’t actually do any threshold checking or failing. Once I’m able to get the base theme updated with better numbers, I’ll define my thresholds off those and configure it using this to actually fail builds when appropriate.
Image bot Optimizer
As most people that have dealt with web performance will tell you, you can’t really try to optimize your site and ignore images. No amount of gzip, js minification, dns-prefetch, etc will account for loading a 200mb background image. While you could remember to go out to a website and minify each image you use…

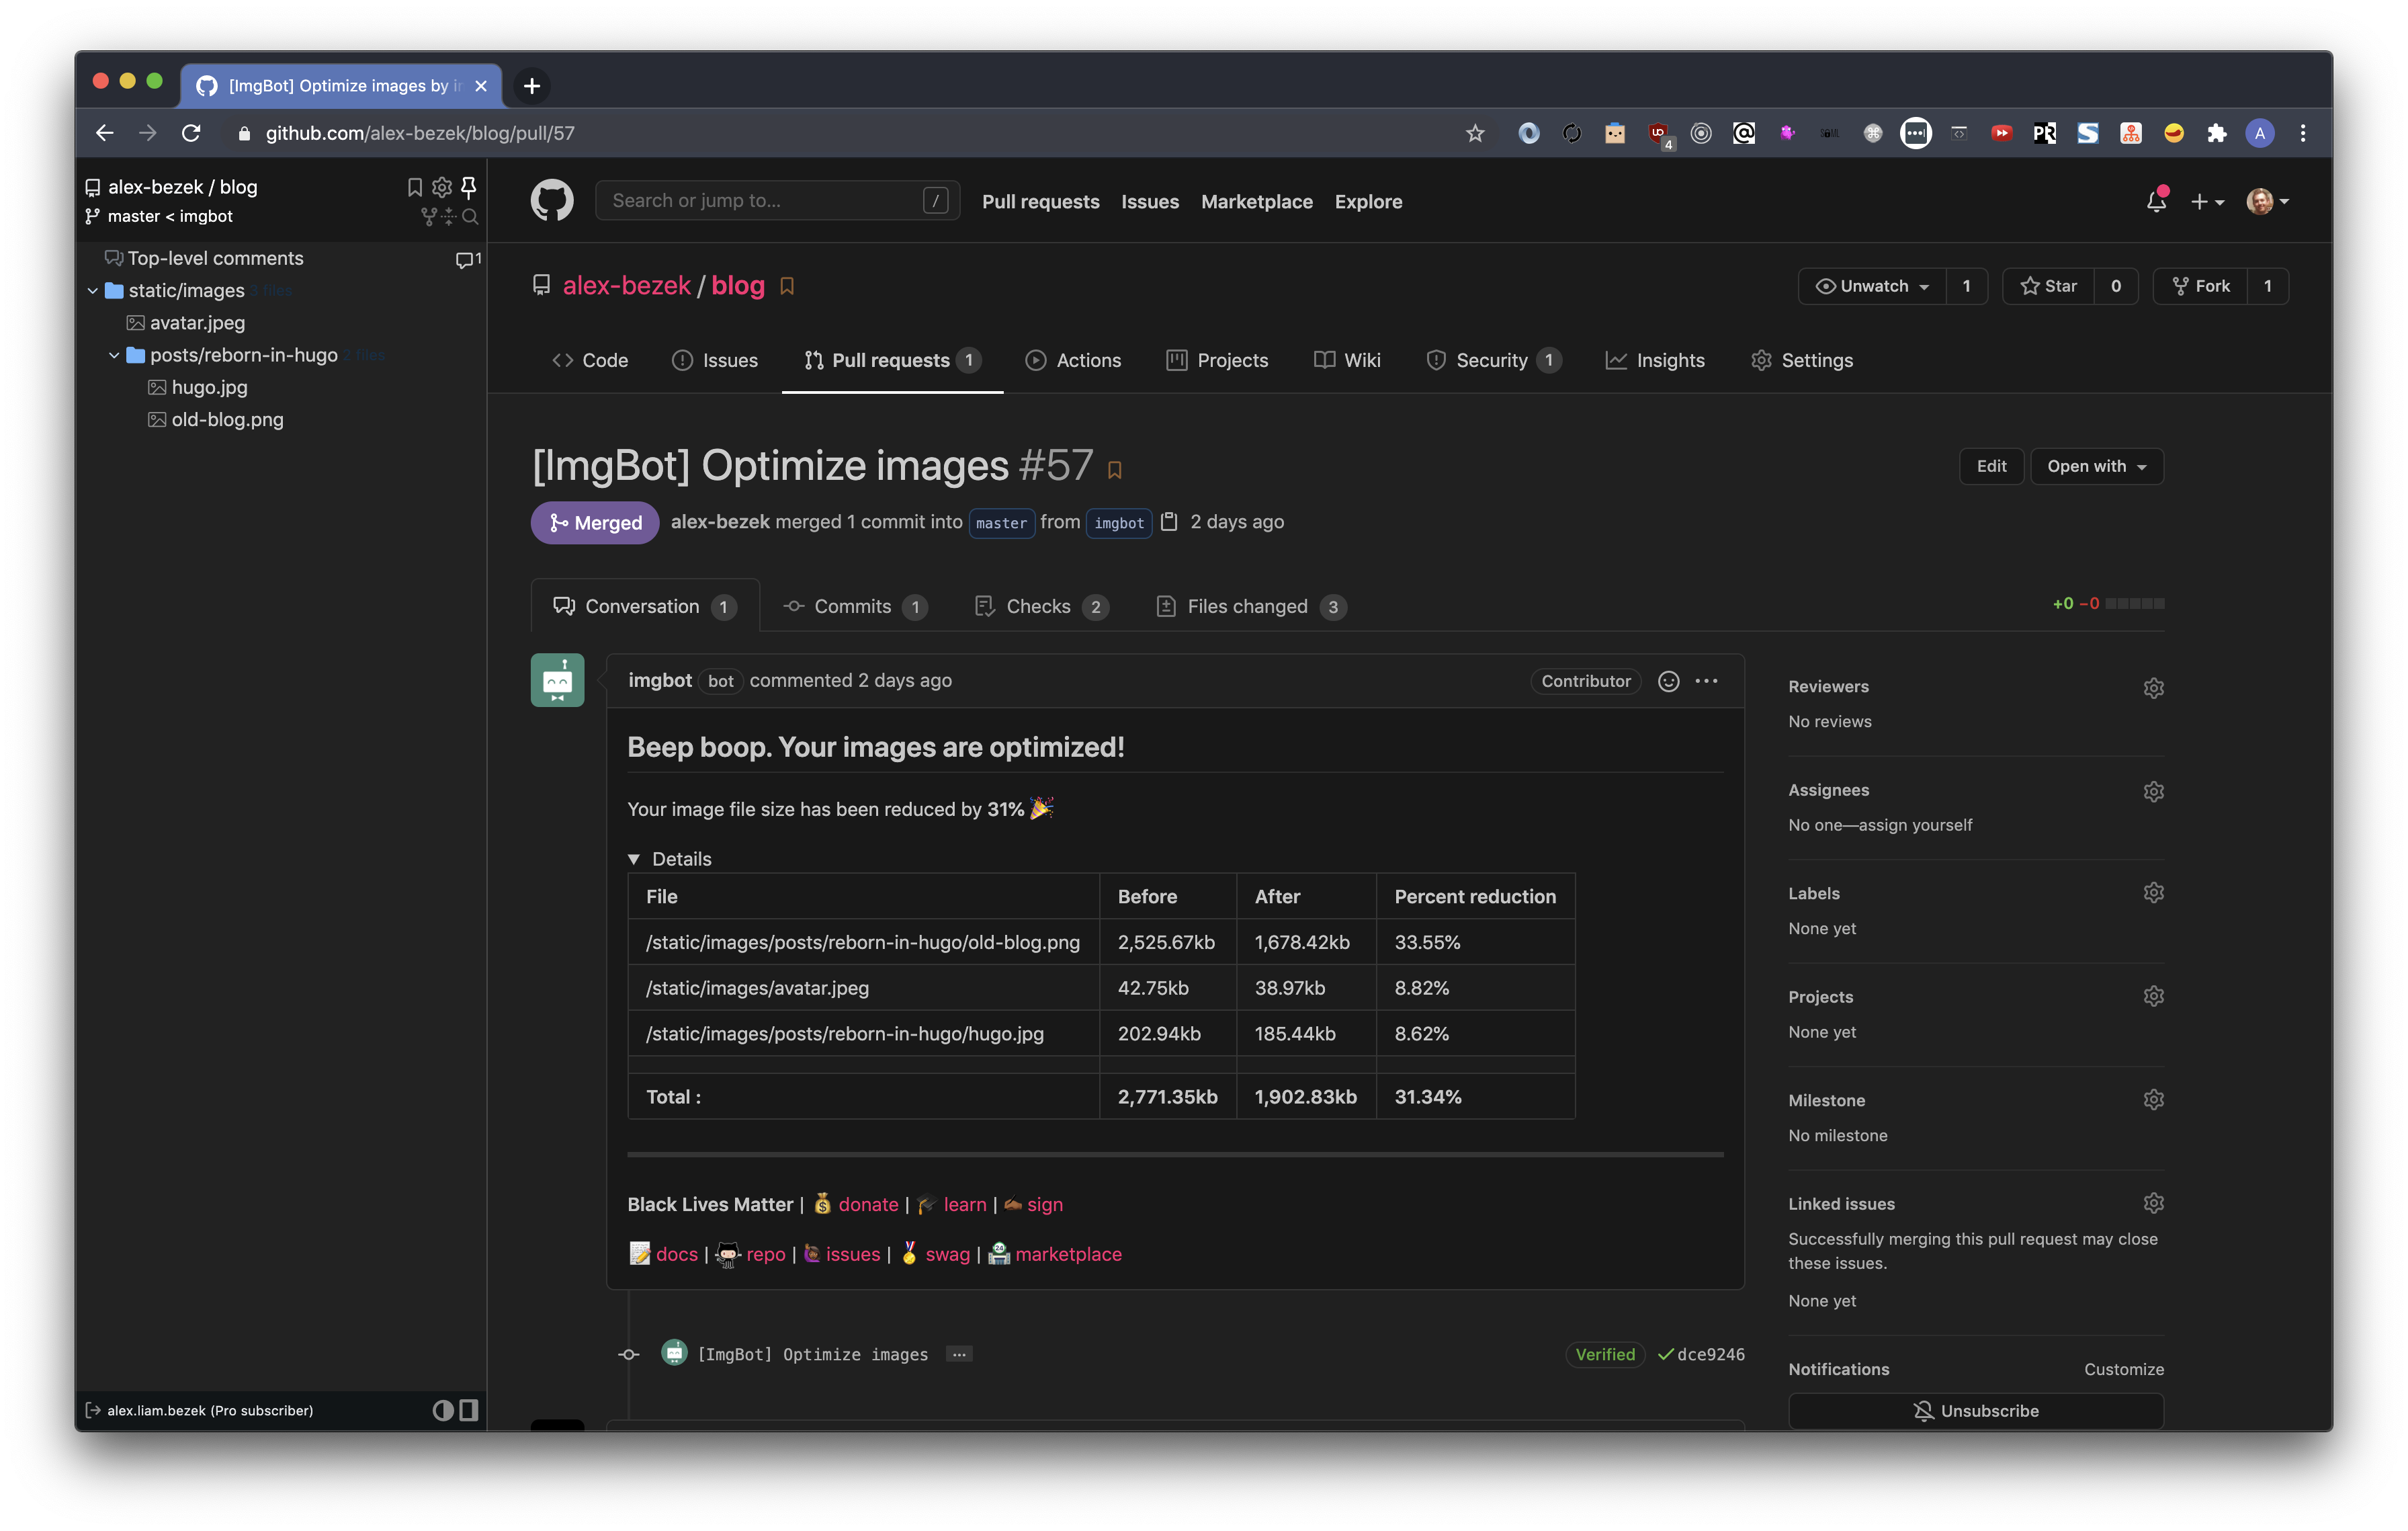
Long term, I need to update this site and the theme too rely on Hugo’s internal image parser and optimizer, but for now, it’s super easy to install Imgbot . Like Dependabot, Imgbot will randomly scan your repo, but in this case it looks for image files it can optimize. If it finds any, it opens a PR. The other day, I wrote a post, merged it with the fully sized images, and moments later Imgbot opened this
Of the things on this list, it’s probably the easiest, lowest risk, simplest one there is. Why not give it a try?
Conclusion
For open source side projects, there is a myriad of tools and services out there with generous free tiers to get you hooked. Using them to automate pieces of your workflows can save you precious future time, and also can be a great learning experience. Even if you never get to use them at work, you can learn from what they do and create something similar. For example, Percy would never be funded at the company I work at currently because we are very much a build vs buy company. So instead we built our own version internally using webdriver.io. We’ve looked to Percy to find inspiration for how to improve our own system (ie: copy what they did).
For now, that’s all. As I tinker with these more in the future, I’ll keep updating these or making new posts so future me has a reference.
comments powered by Disqus